Welcome!

I will be documenting the construction of our pole barn home. We decided to build because we had been in the same mobile home for many years. The main reason I started this blog was to help others. When we first started out, we looked for information to help "Do It Yourself" people such as us but didn't find much on the web. With the exception of the concrete foundation work and enclosing the structure, we are doing all the work ourselves. But we have been blessed with family members and friends who have helped us a great deal. We broke ground in July 2006 and we moved in October 2007. If you want to read more about the details of our plans, click here.
Think of this site as a diary of DIY home construction.


Update January 2009:
Hi friends, I had made my blog private for some time but have decided to open it back up again. I was way too busy with other things. I am happy to report we have moved in but still have much to do to complete things. There is still trim to put up, some grouting to do, a few more floors to finish but more on this later. I am in the process of redoing this blog and just wanted to thank everyone for visiting :)

March 25, 2009

Burlap Tomato Planter

If you're a gardener, chances are you have heard of the Topsy Turvy tomato planter. The same company also offers their tomato tree. I've been curious about them for a few years but have never owned one. To be honest, the hanging Turvy didn't seem to be quite sturdy enough for those heavy tomato plants. Maybe this tree planter they put out is a bit sturdier. I thought the original hanger they offered would be great at growing strawberries or perhaps cherry tomatoes. If you have a Topsy Turvy product, please leave your comment to let me know how well they've done for you. Anyway, last week I got it in my head that I was going to try making a hanging tomato planter out of burlap. I went to wally-world and bought burlap for $2.14 a yard along with some heavy duty poly cord. I found some florist's wet foam I had left over from a project and got a white kitchen trash bag. These pictures are in sequence and hopefully not that hard to follow:

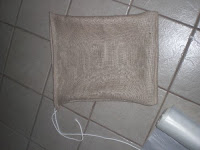
I folded over my burlap and cut out a large rectangle. This gave me 2 pieces that would be easy to sew. I then took the cord and laid it at the top of one side of the burlap. folded the very top of the burlap over the cord and pinned it , leaving myself around half an inch of sewing room under the pinned burlap. I then flipped over to the other side and continued pinning. I pinned this all the way around the top. I then sewed all the way around the burlap underneath the pins. Next I sewed the 2 sides. I then removed the pins and turned the sack outside in. this gave me a knapsack with a drawstring.
Inserted the trash bag into the sack. Next, I cut a circle out of a 4x4 piece of wet florist foam and set it in the bottom of the trash bag. I then started filling the bag with potting soil
checking as I went along to make sure the foam was in place and flat. After I had filled the sack a little more than half full with potting soil, I pulled the drawstring pretty tight and laid the sack on it's side. With my finger it was really easy to find the circle in the foam that I had cut. I then cut a hole through the burlap sack into the wet foam hole. then I inserted the tomato plant *this is a jet star*. Then I suspended the planter from a hook on my front deck. this is view of the bottom. Then I cut small pieces of the foam and stuck around the whole and the base of the plant. This will keep water away from the leaves and stem and from running down the plant and rotting it. This is the final product. Now I made drain holes making sure I put none close to where the plant hangs down. I cut another hole in the side of the sack for another plant. I water from the top. I will report on how well this works for me. It isn't really pleasing to the eye but if it grows maters I don't care :) I have heard that one of the key things to remember is to water often. This may prove to be a complete flop but if so, I will let you know soon enough. Here are some links I had book marked on homemade hanging planters:
Growing Tomatoes in Black Plastic Bags
Upside Down Tomatoes
Upside Down Tomato Planter
Do upside down tomato planters work?



March 11, 2009

More work on kitchen island

Well, not completely done but thought I'd post some pics of the top and trim that is completed. The stain I used is red mahogany and the light trim is a natural stain. I followed up with around 4 coats of poly on both.

March 6, 2009

Garage Sale Finds

A few months ago I came upon a huge garage sale. This place had tons of stuff and amongst the goodies there I found these four
outhouse paintings. I gave 2.00 for all of them. Right now I have 2 in the small bath and 2 in the master bath. I love to shop garage sales but seldom have the time. I also love thrift stores. You can find so many useful and beautiful things and why pay big money
when you can shop at a thrift store for a fraction of the price? Saving money, especially in
these turbulent economic times is really on the top of my agenda right now. For a long time I have preferred to buy clothes at consignment shops rather than buying new. If I can find a top quality consignment shop I could stay there for hours sorting through the clothes. Most of my friends are the same way. We can have a ball going to garage sales, thrift stores and consignment shops. At the same sale, I found this small lamp. I filled it with potpourri I had at the house.My latest money-saving project is making fire starters. I save my paper egg cartons, dryer lint and left over scented wax candles. I fill those egg cartons up with dryer lint then pour my melted scented wax leftovers from my candles over the lint. Then just tear them apart and store them in a folger's plastic coffee can. You won't believe how good those smell when you take the lid off of the can. The highly scented candles work the best. I like to buy products such as clothes soap, dryer sheets/fabric softener, trash bags and paper products from the dollar store. Most of the other items on my weekly shopping list I get at Wal-mart. In comparing prices, I find there IS a difference - the dollar store is much cheaper on paper products and even some grocery items but you have to shop around. Make a list of those things you use daily and shop around a bit. It's worth it when you make note at the end of the week what you spent and where.

March 3, 2009

Hickory Headboard

This headboard is made of hickory wood which my hubby had cut down 13 years ago.
He went out in the woods and inspected the best trees, cut a few down and then let this hickory sit in our workshop until he had time to start building it. Right before we moved in he started on this project and had it completed in around 12 weeks. All by hand, it wasn't an easy project. We still lived in our trailer and our children were little when he got it in his mind to do this. He basically used a hammer and flat chisel to get down past 2 layers of bark. Then he sanded for what seemed like years. I kept on at him walking outside and quizzing him saying "How much longer"? After the sanding was done he brought it in our bedroom and bolted it to the bed frame - now this headboard is so heavy it took our son and him to carry it into the house and my hubby is a very strong man :) Only drawback is if we want to move it in the future, it would take an act of congress. After he got it set up in the bedroom, I put 3 coats of tung oil on it and then the added around 3 coats of polyurethane. We have leather which has to be cut in strips to wrap around the ends of the posts but haven't done this yet. I've seen this done but I should have paid better attention at the time because I cannot remember where to start the leather. If
you know anything about this or have any ideas, let me know. I'm supposed to cover those screw heads if I remember correctly. There's not many of them, only 2 on each end. Hubby asked me after this was done if I wanted him to make a foot board since we still had more hickory in the shop. I told him I wouldn't do that to him..... LOL

March 2, 2009

Box Wired for Generator

Forgot to mention a few weeks ago that the husband got the box wired which will be used for back-up power. We suffered through the worst ice storm we had ever known in January of 2007 and some folks near us were without power for weeks. Before we broke ground on this house we decided to wire it up for emergency power using a separate box and romex going to various receptacles throughout the house. Now what we've basically done is put three receptacles in the kitchen, one next to the bar, one in the master bedroom, two in the living room, and one in the pantry (for refrigerator to be plugged into). The generator will be set on the east side of our home and when we get the frame built for it I will post a pic. Seemed like a pain at the time stringing the romex for that separate box but during the next power outage we'll be glad we took the extra time to do it right. We have a wood burning stove for heat which will keep us warm and cozy during any outage. Losing lights during a power outage was never really an issue with us because we have oil burning lanterns that we've used in the past when we've had to, but there was always that worry over the fridge not being on and us ending up losing everything in it.
This ought to fix that :) As you can see in the photo, we have yet to trim off that spray foam insulation.
The other pics are of our latest ice storm which took place January of this year.
The trees were really bent over and the birds sunflower seed habit just about put us in the poor house.

March 1, 2009

Kitchen Window Trim

Today is the day to put the trim up around the 2 kitchen windows. We're going to build pretty small aprons for these windows since in the future I'll be laying tiles for the backsplash directly underneath them. You can see in the pictures that the wallboard is already put up for the tile backsplash. Still undecided about the stain I will use on this window trim. The wood we are using for our trim are pine 1x3's (we got free) and have plenty of imperfections which doesn't bother me much, but I was thinking the black
smudges on them would show through a little TOO much if I don't go with a dark stain. I had wanted to use natural stain, but if I do I
think our arms will fall off from all the sanding we would have to do. I'm really thinking of trying the walnut stain. Now on our kitchen island, we are using red oak for the top and pine for the trim, we sanded this trim down on the island and it looks so good. Last night I finished the 1st coat of stain on that and will post a pic of my work soon. I'm glad we're not getting a great hurry to get this finished, the best lesson we've learned since undertaking this project is patience. As you can see in these pictures, to the right is where I left off painting the wall last night with primer.